How the spine is organized and why it can hurt: Basic Lumbar spine mechanics (8 minute read)

To enjoy healthy spinal movement it is helpful to challenge any view we may hold that our spine is a heavy, ridged, scaffold. We cannot see our spine. How we imagine any part of our body, influences how it behaves. The use of the imagination to change movement behavior has been studied directly at least since the early 1900’s. In the simple words of movement teacher Eric Franklin, “having a thought or holding a picture in the mind sends a message through the nervous system because thoughts and the nervous system are connected.” [2] Our nerves, of course, are hooked into muscle and fascia. The images and metaphors we use to understand ourselves change the motor-patterning of our neuro-myofascia and skeleton.
Practitioners from the manual and movement worlds use loads of common images to improve spinal mechanics. As an experiment to understand your own potentially pliable spine, practice the following visualization:
Exercise: Sit in a chair.
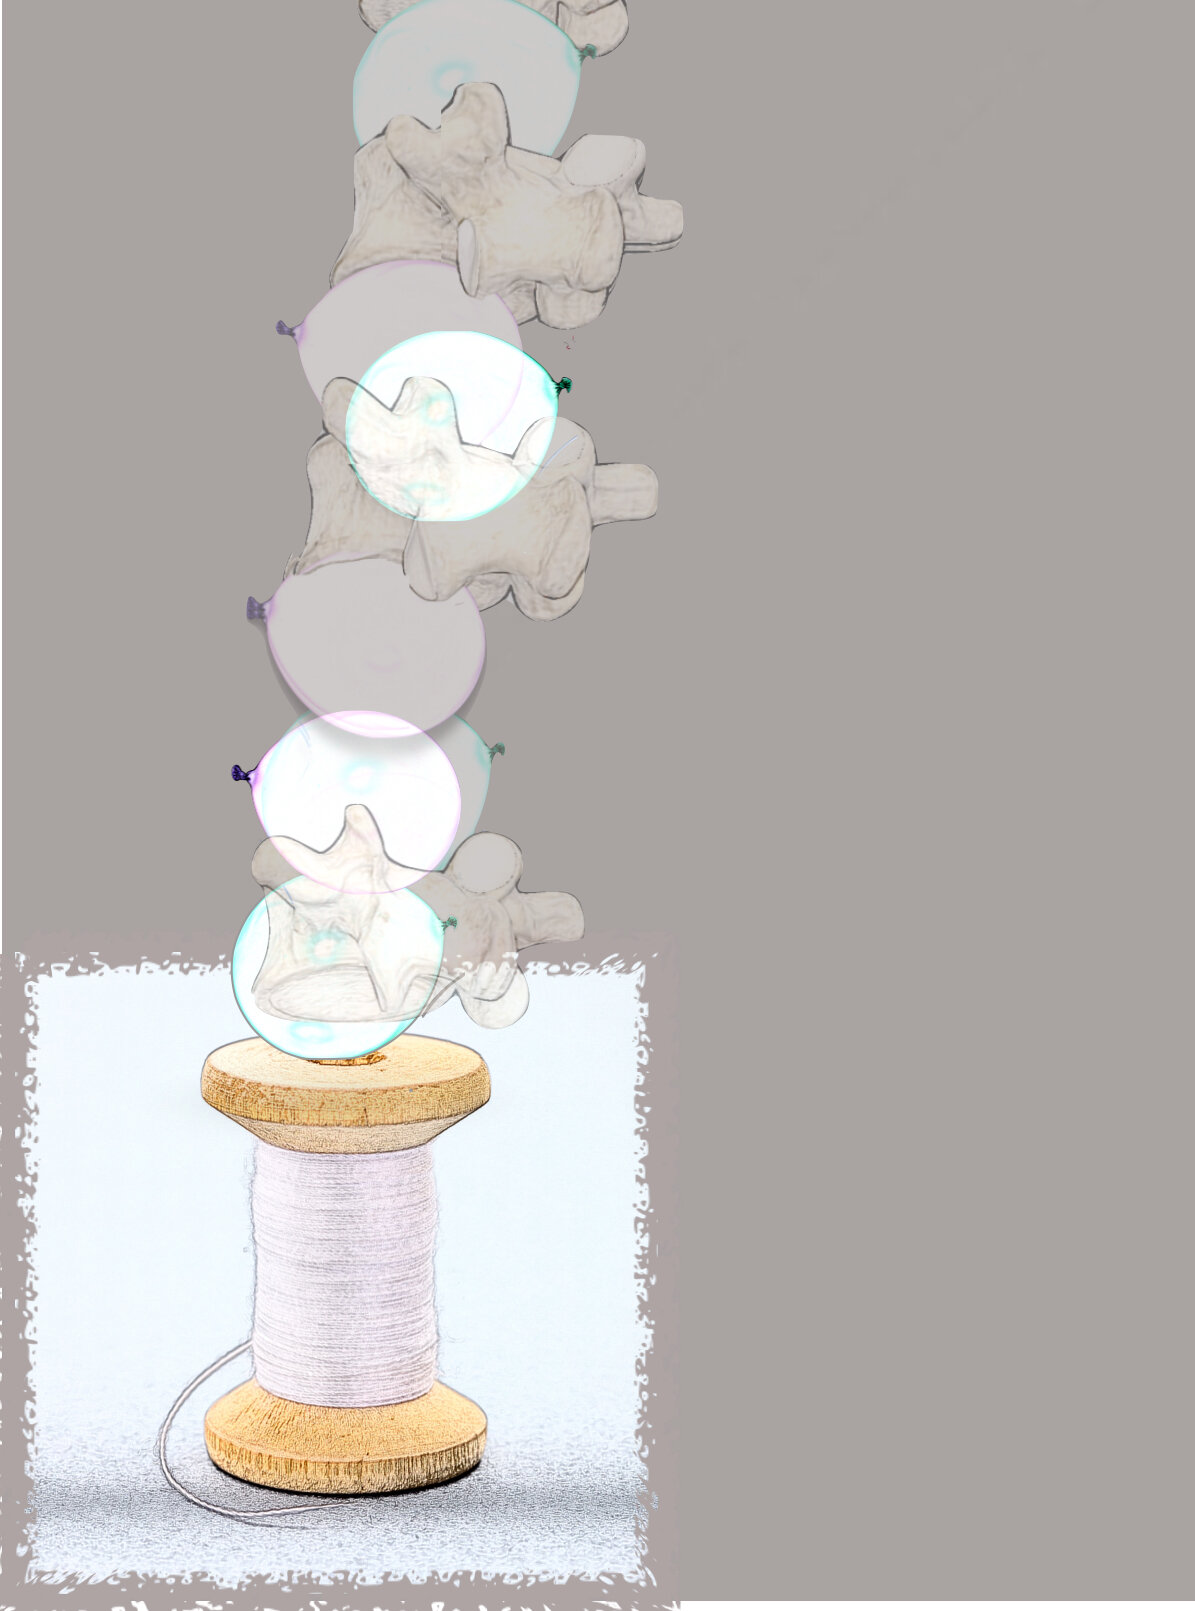
Imagine that each vertebra in your spine is a light wooden spool (the kind that thread winds around).
Imagine Each spool neatly stacked on its counterpart below.
insert a small, strong water filled balloon between each wooden spool.
To keep it all in place run a strip of flexible “bio-tape” down the length of your spool stack in front.
make tiny, almost imperceptible undulating movements with your spine. Get a little bouncy with the movement.
Can you feel the springiness of your water filled balloons? If yes, great! If no, imagine springiness.
If you have time, juice up any of the balloons that feel like they could use more water.
Use this visualization throughout your day when your back feels tired or painful. Notice any sensations that accompany this visualization. Remember: the results of using images to change structural behavior are extremely variable and individual. An image that works for another person may have less impact on your body. We encourage you to stay playful and curious as you use imagination in this way. If, after some practice, the visualization does not elicit sensation, use your imagination to tweak or change it to suit you. By all means, keep practicing the habit of using your imagination to understand yourself!
We’ll provide more of these images later in this blog and others. Look for the the italicized “Exercise.” You can also “juice up” your lumbar spine with the help of this video.
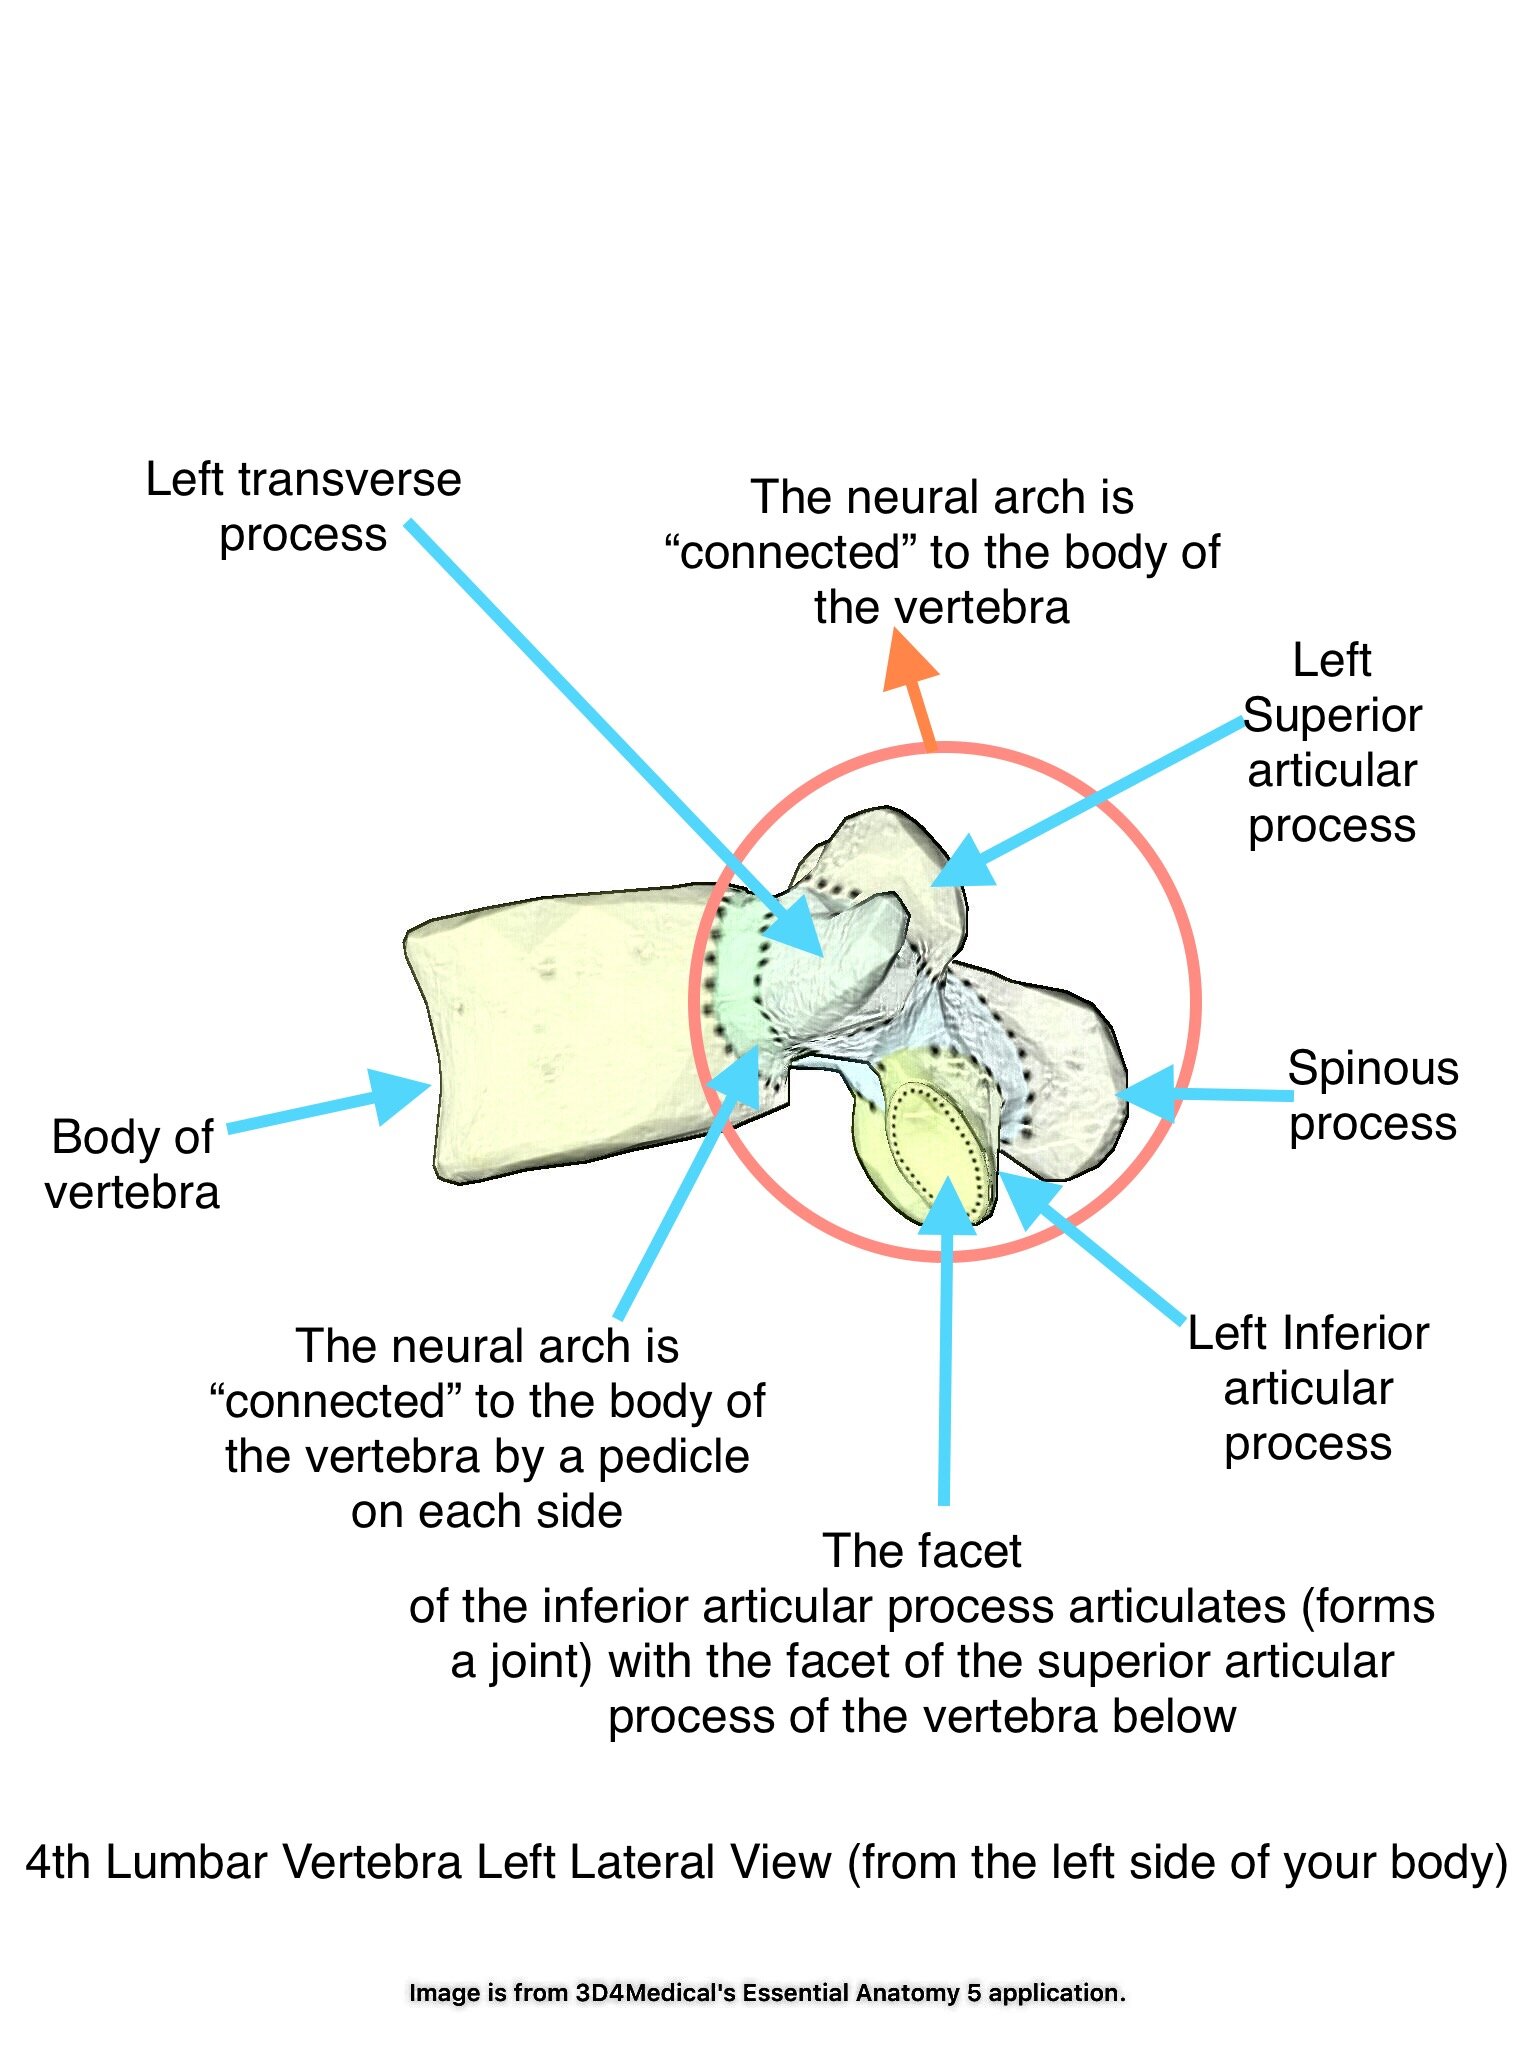
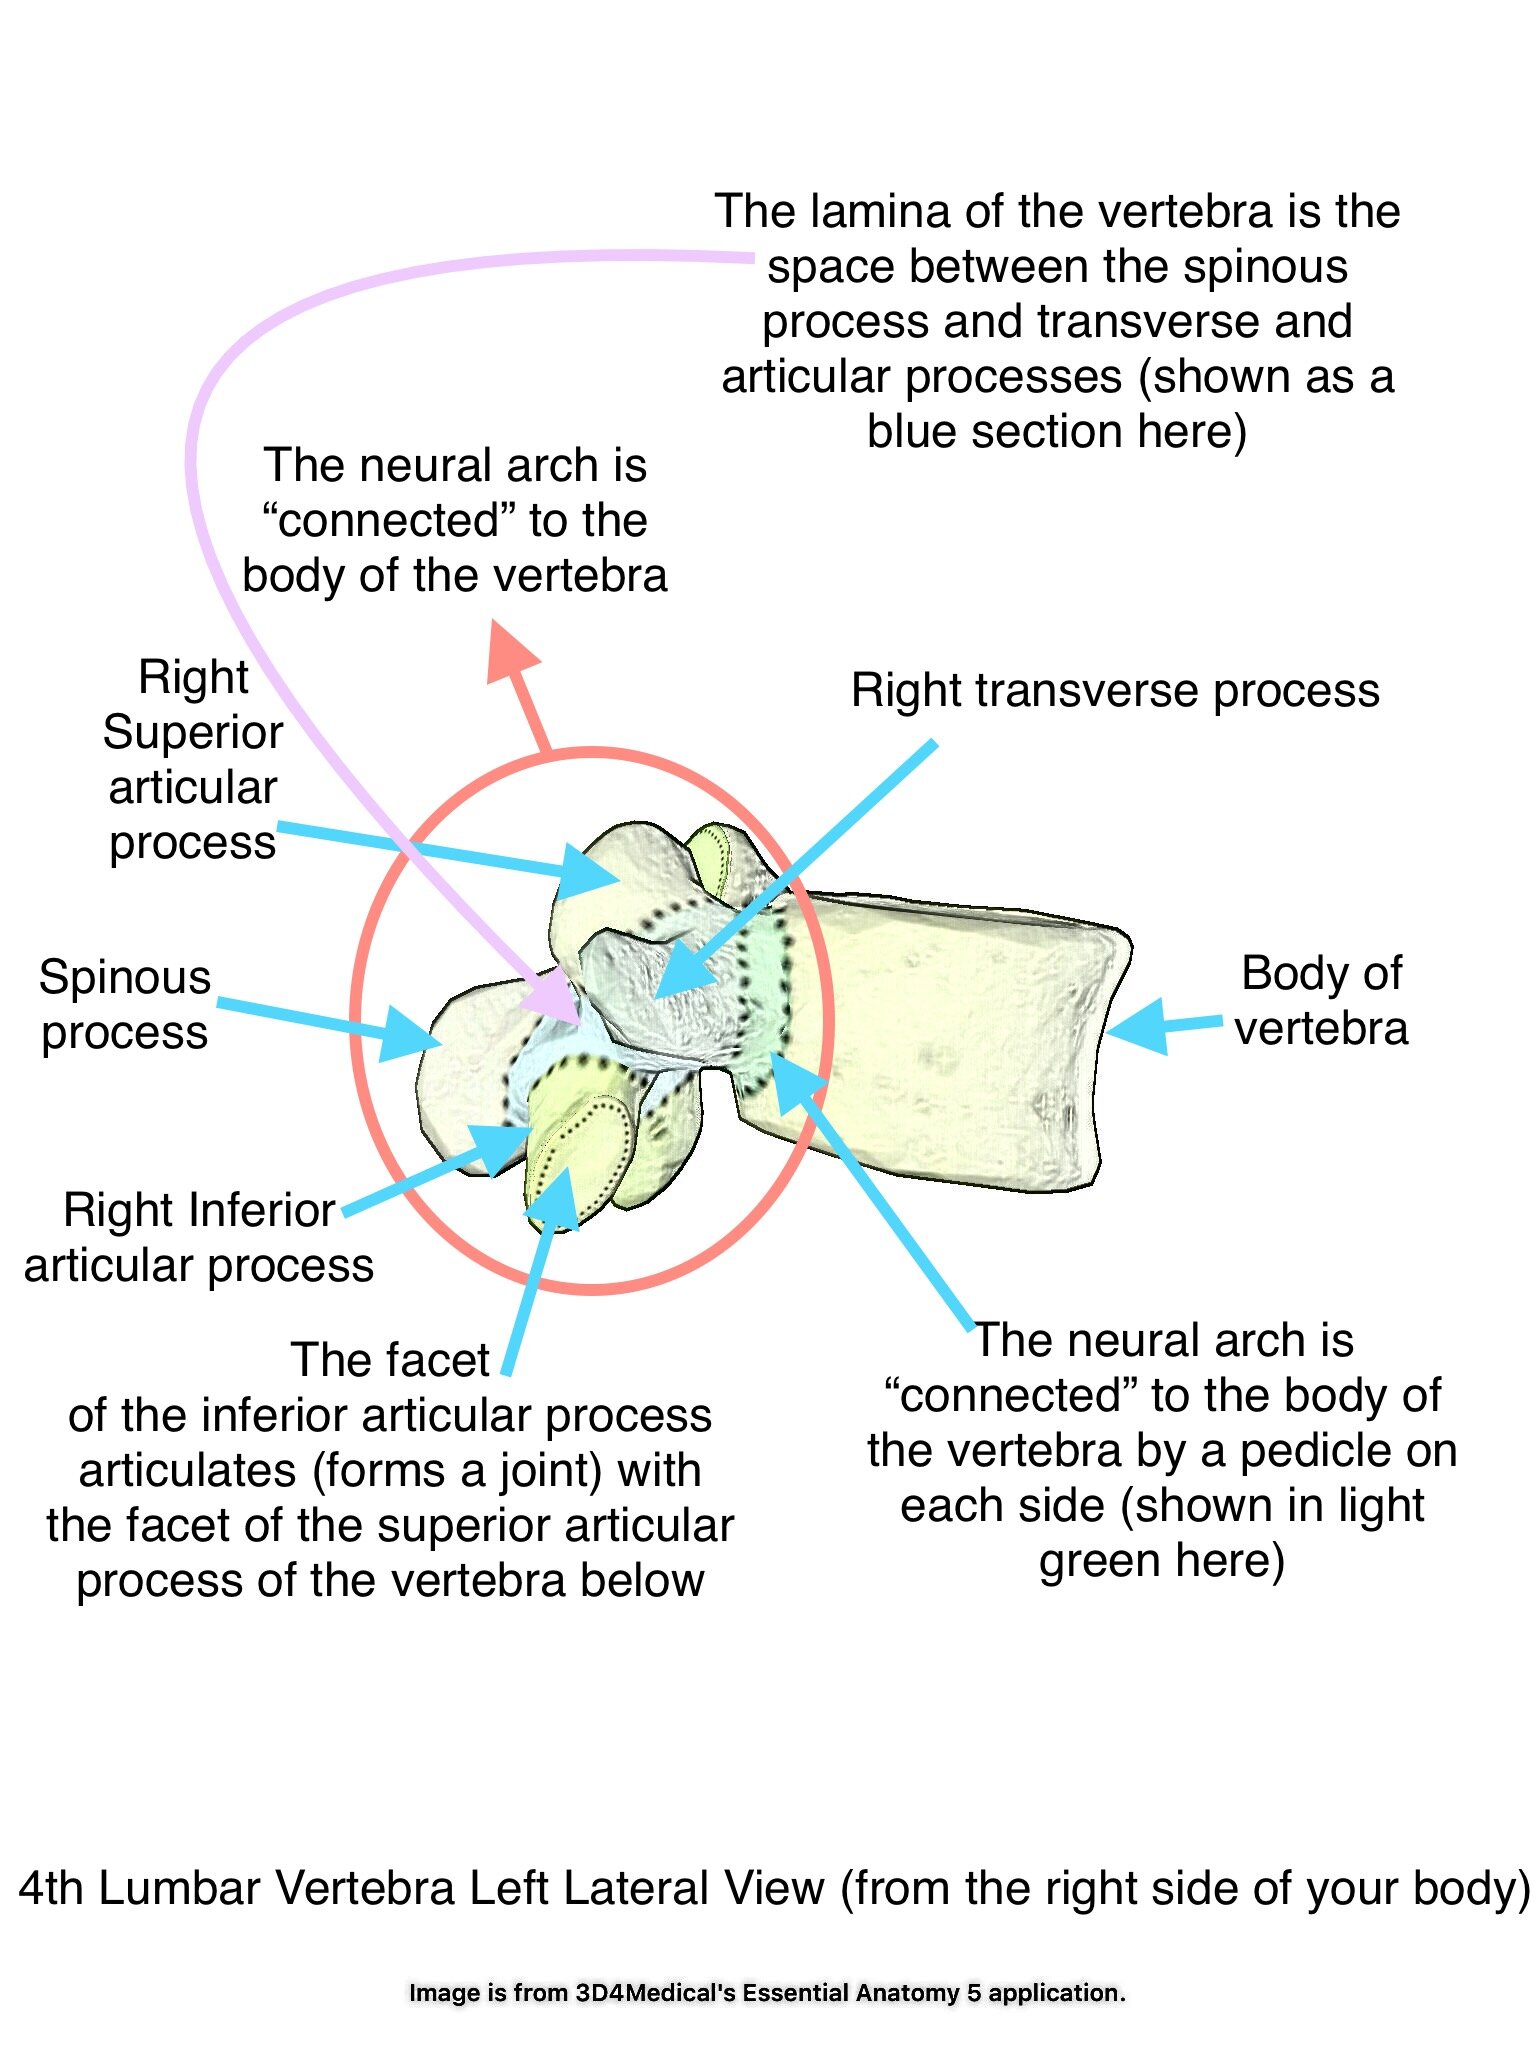
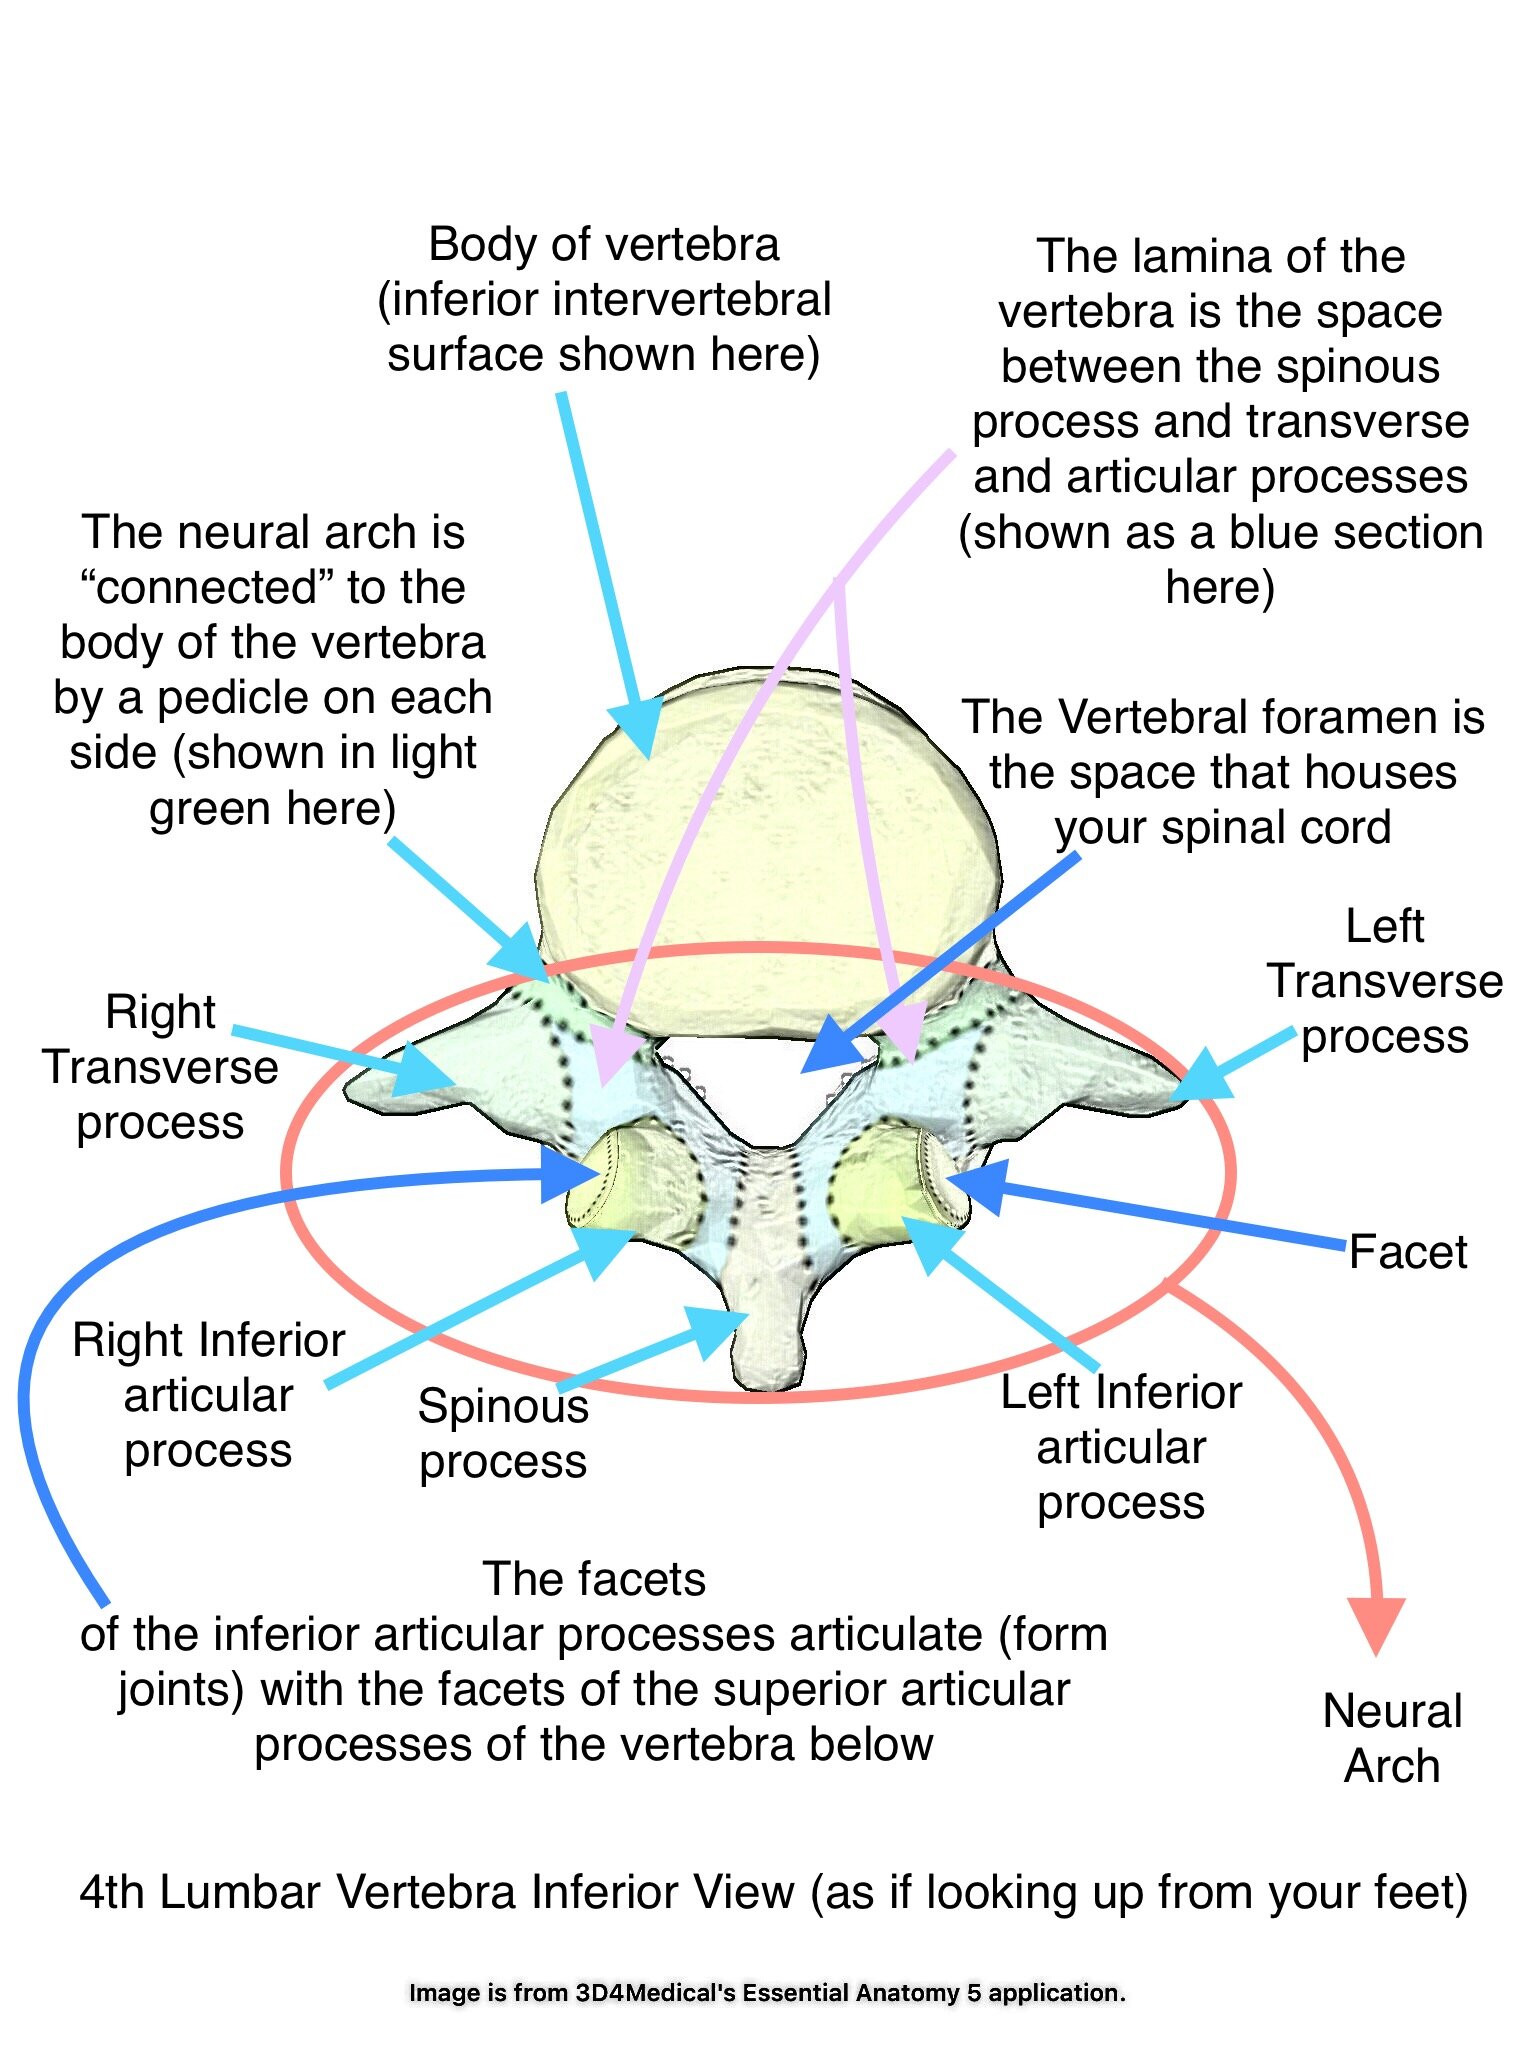
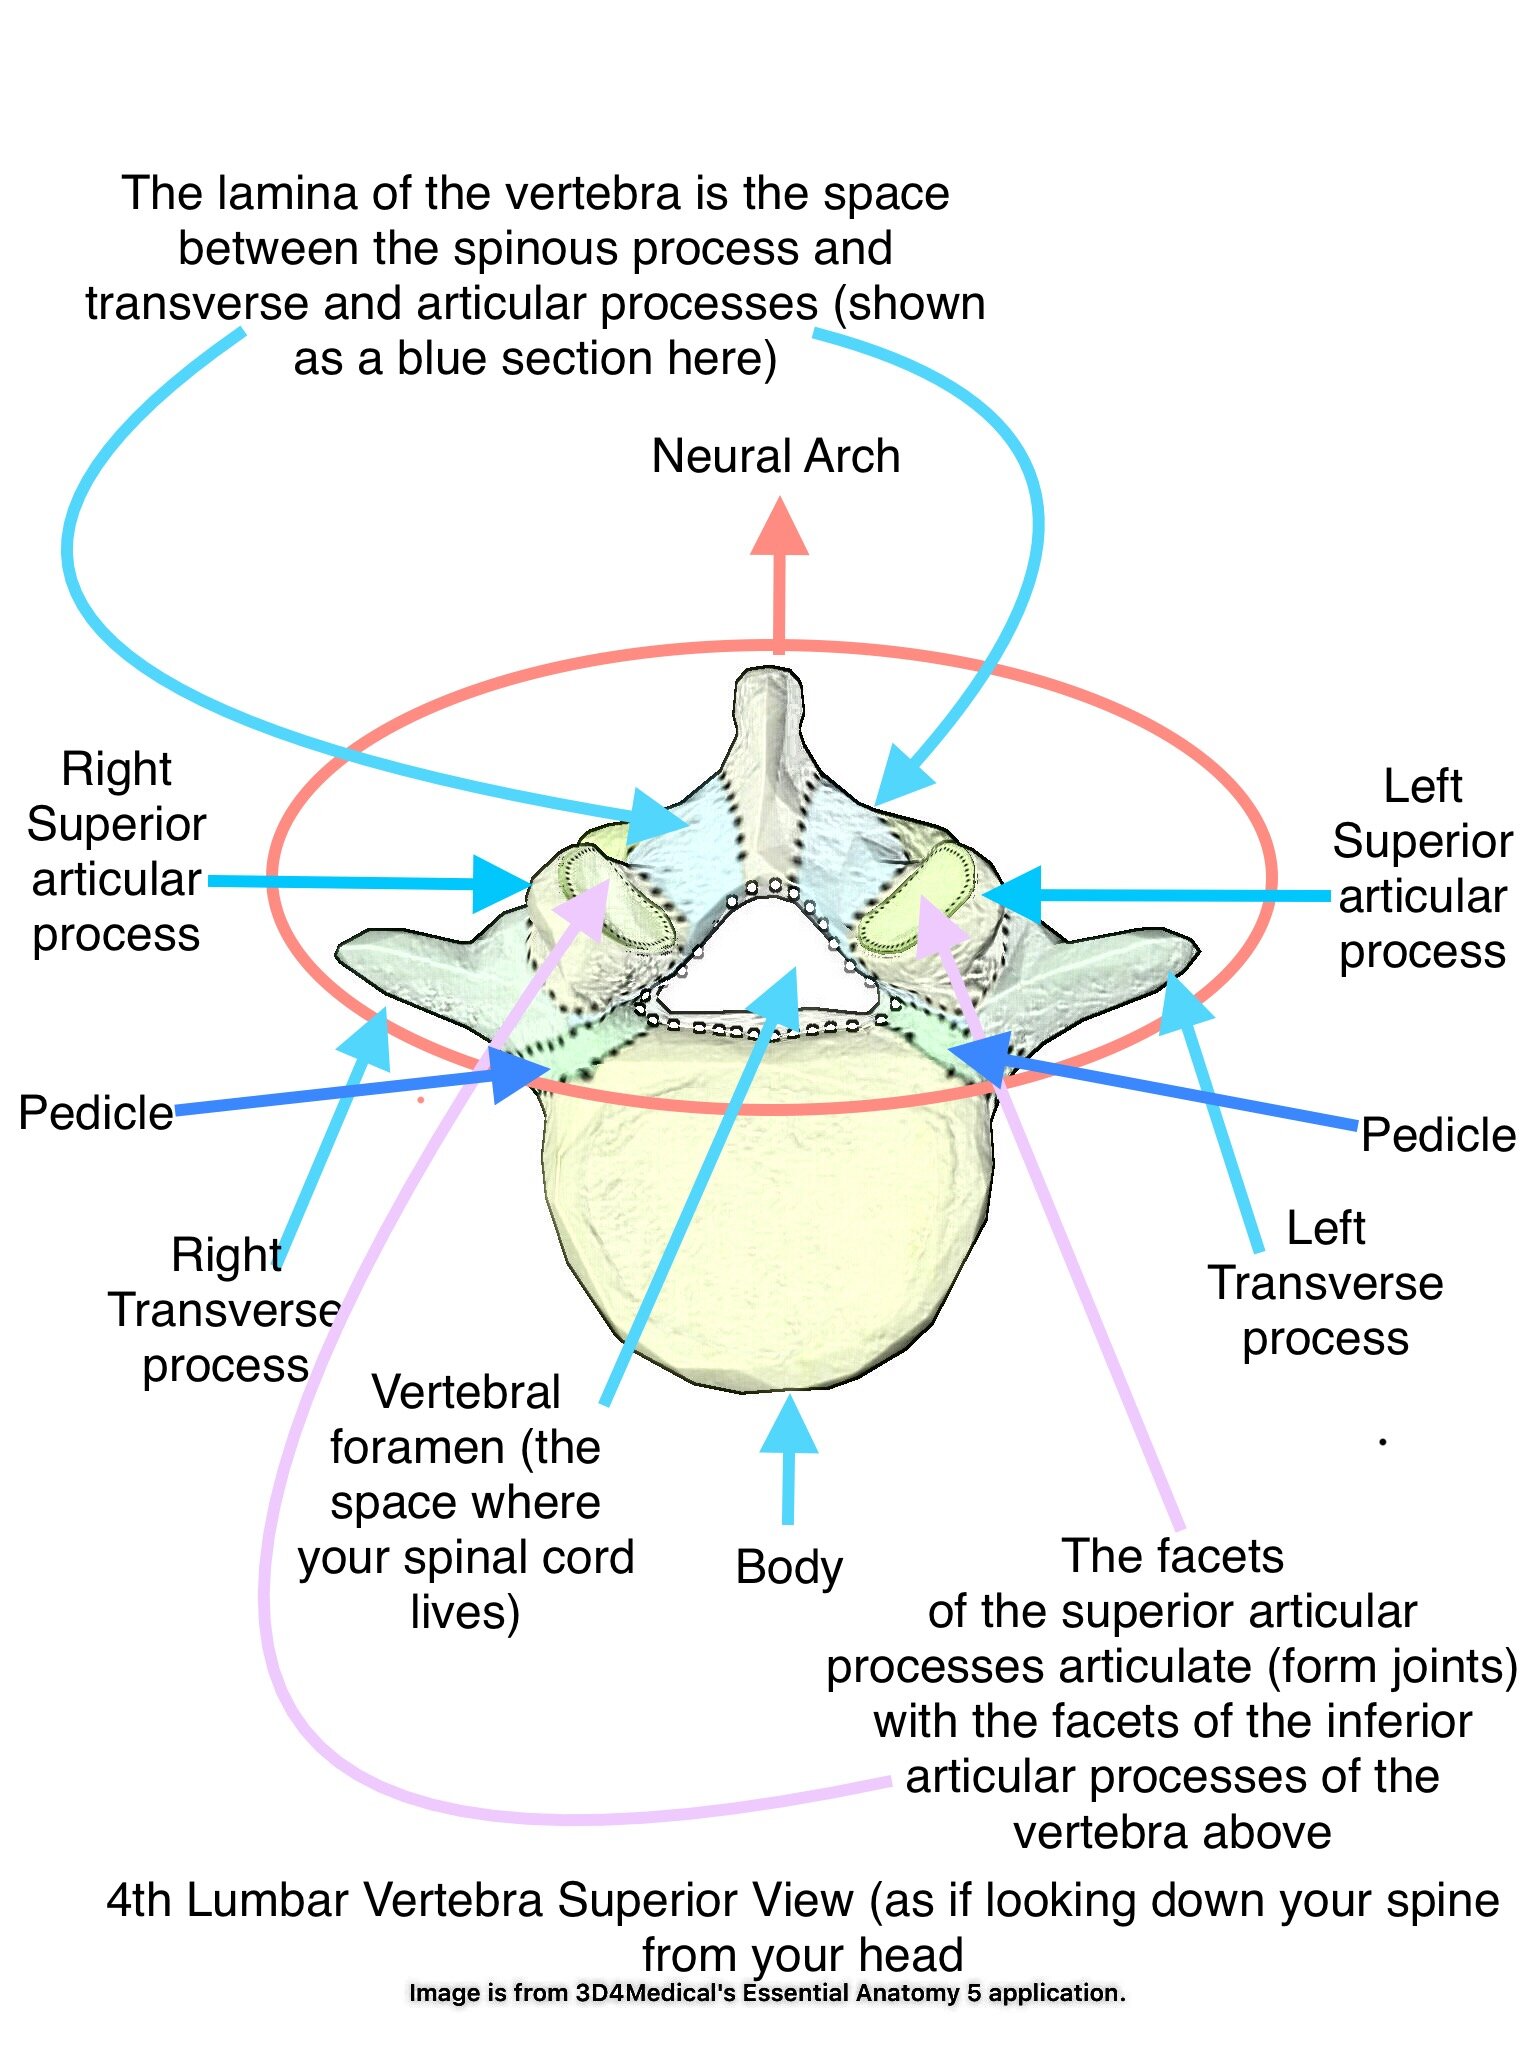
Like the entire spine and everything else in the human body, movements of the lumbar vertebrae are guided by their shape. Anatomists will tell you that structure and function are linked - for life. The shapes of each vertebrae allow them to move in particular ways. For a more detailed explanation of the shape and function of lumbar vertebrae click on the picture of Lumbar Vertebra number 4, shown below. If the details don’t interest you in this moment, read on!
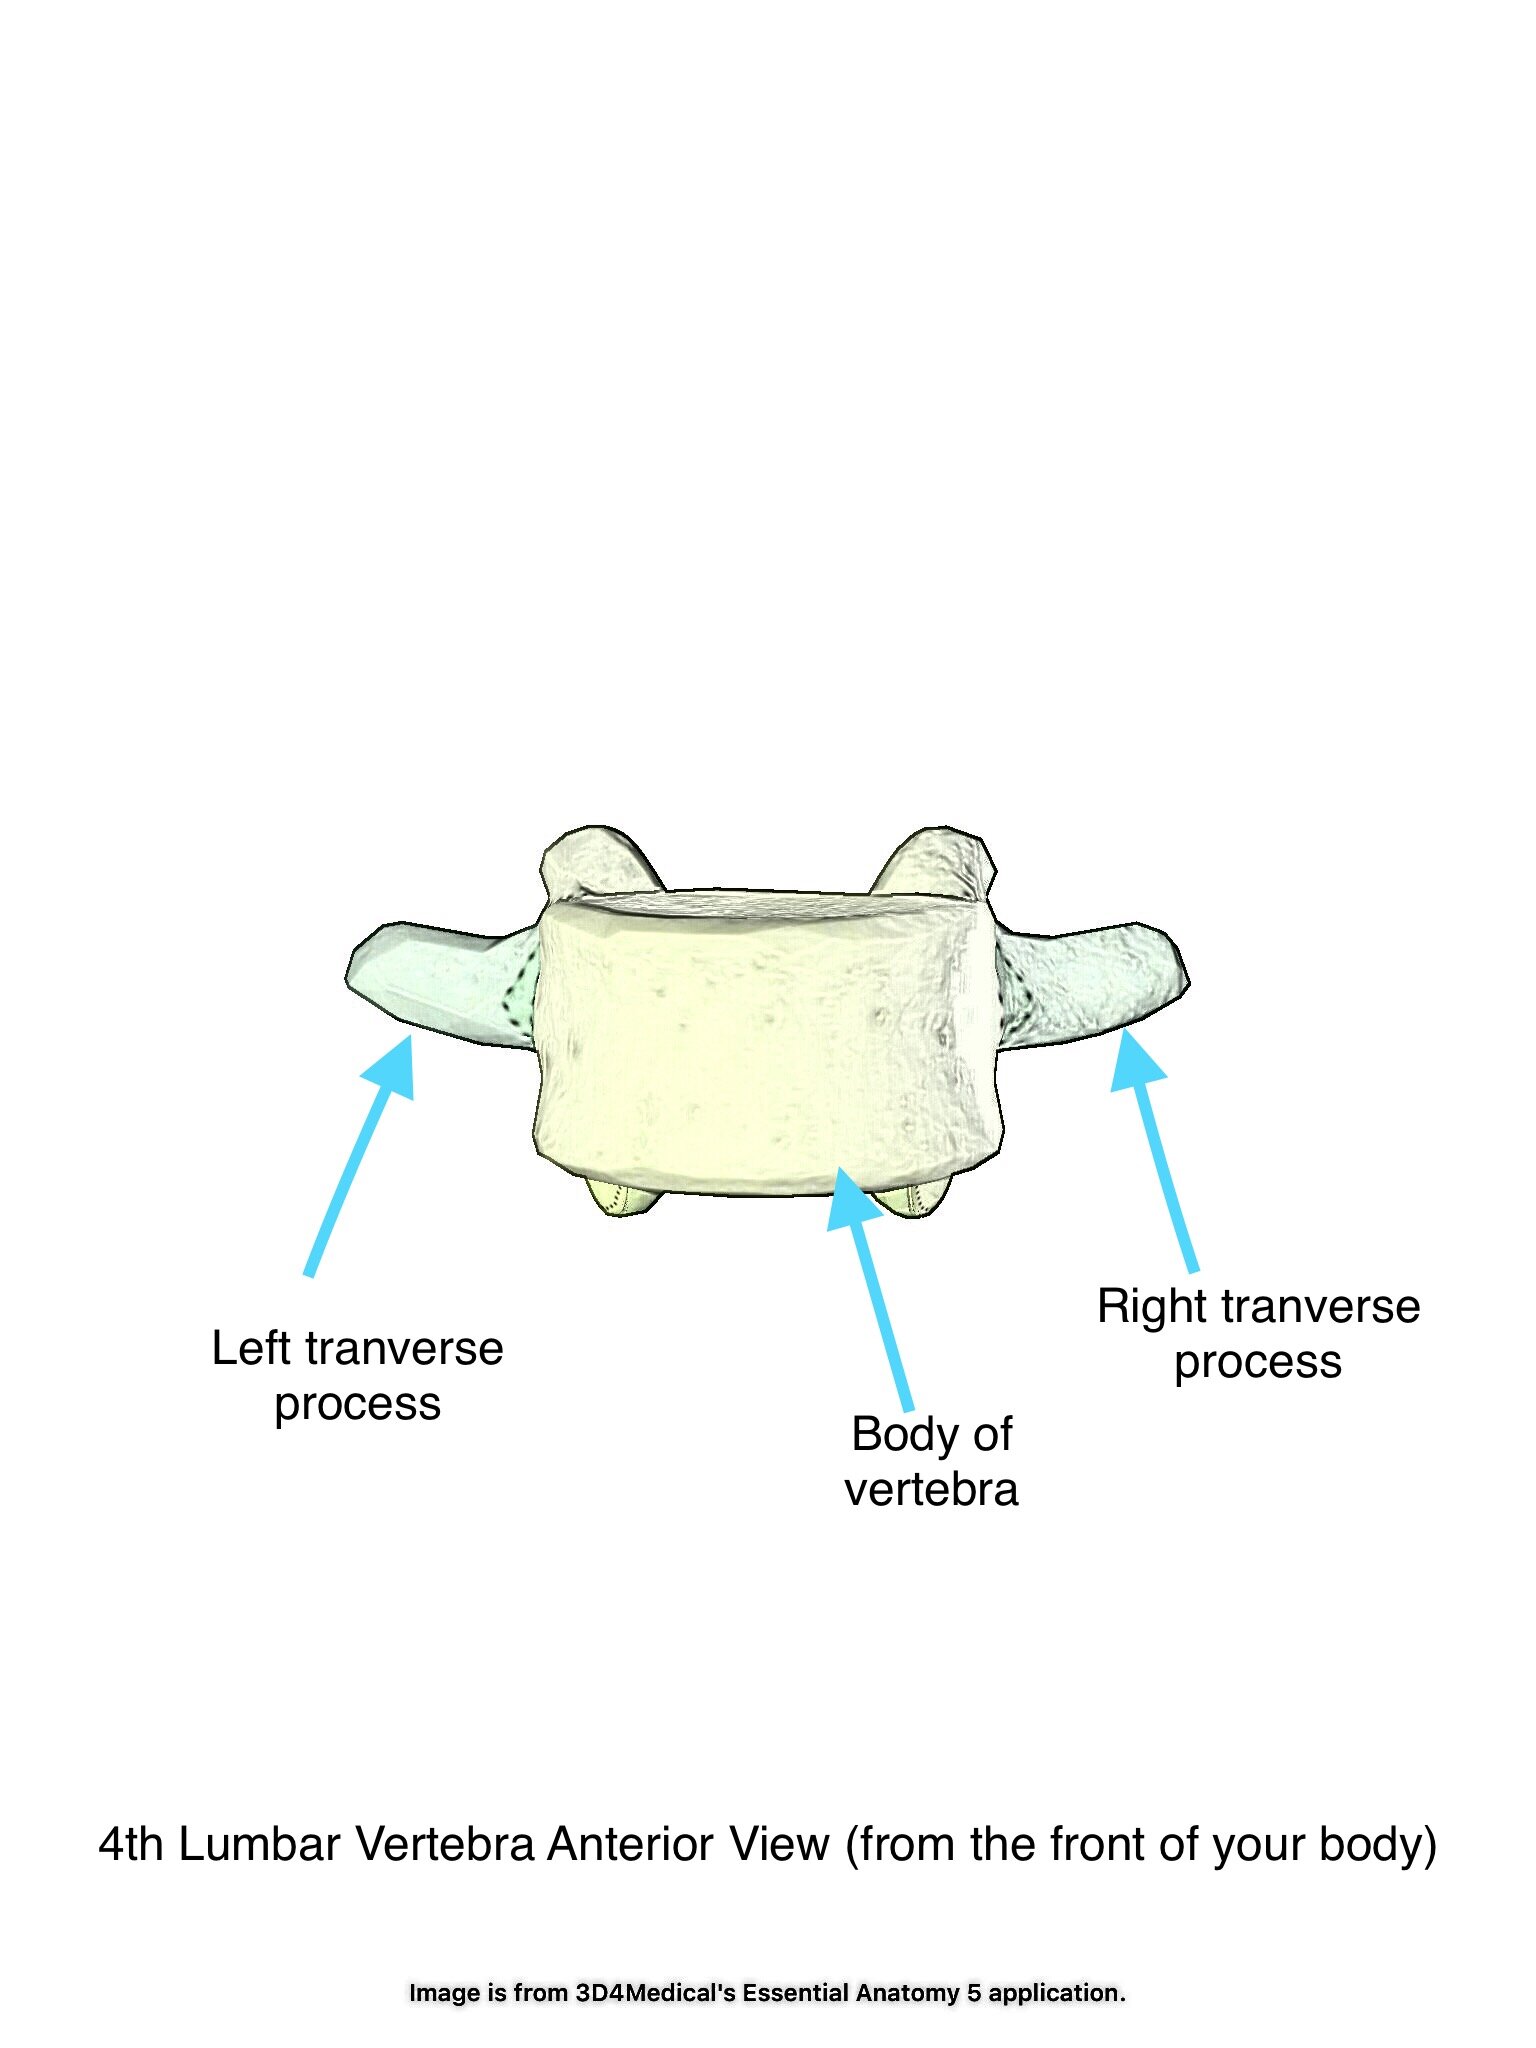
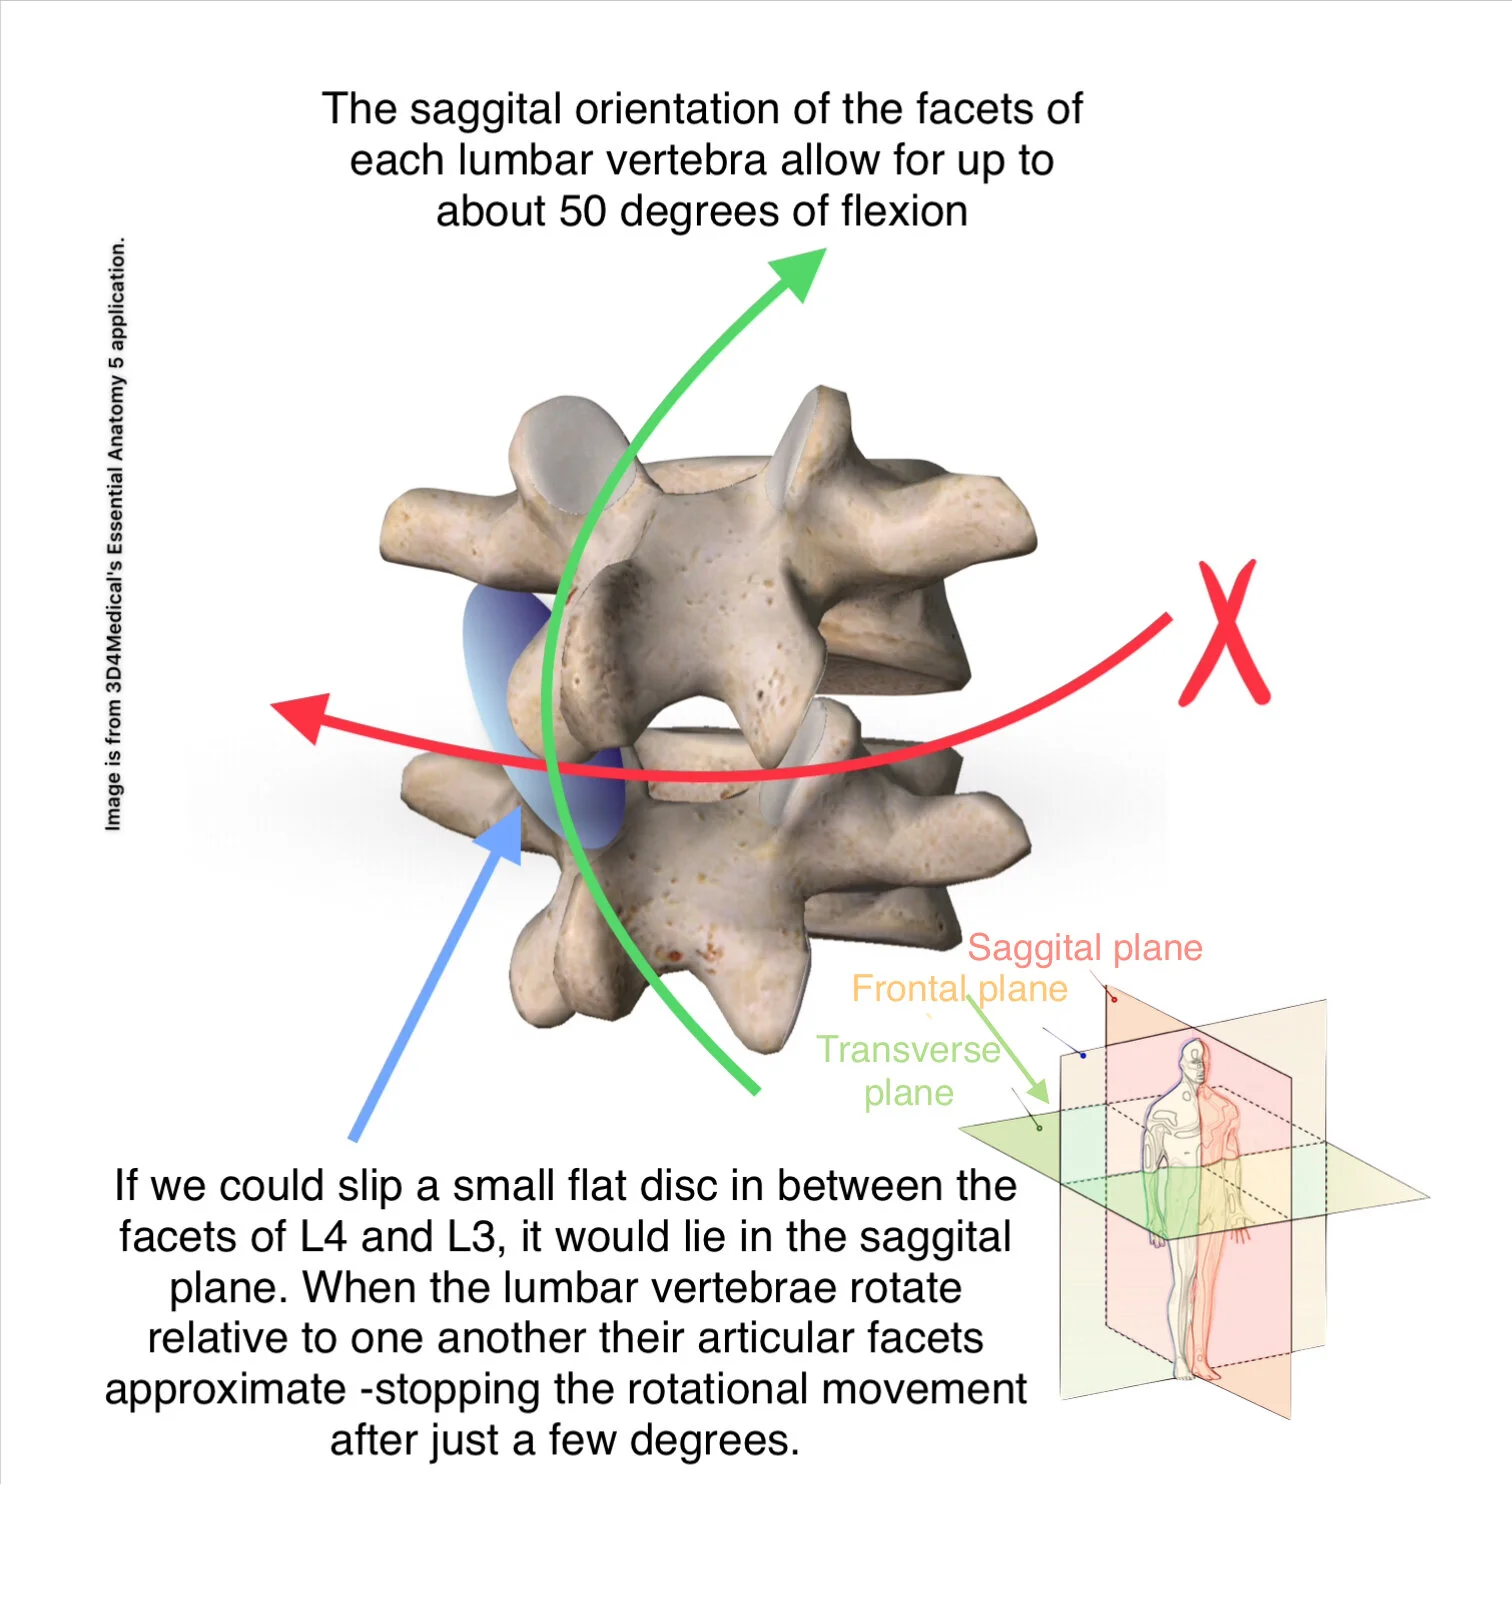
The lumbar vertebrae are shaped so that the only movement available to our low back is flexion, some sidebending and very little rotation. This means that when you are standing, if you’re like most people, each of your lumbar vertebrae can only rotate 1,2,3, or 4 degrees. If we add all these degrees of rotation together, your lumbar spine is only able to rotate between 5 and 16 degrees.

Adapted from: Oatis, Carol A. Kinesiology: the Mechanics and Pathomechanics of Human Movement. Lippincott Williams & Wilkins, 2009.
So the lumbar spine does not rotate very far. But thanks to the greater rotation available to the thoracic and cervical spine, you can check your surroundings instead of trusting only your backup camera (and please do!)!
Our lumbar spines may not be very good rotators, but they are excellent forward and backward benders. If we combine all the degrees of flexion (“F” for “forward”) available to our lumbar spine, most of us can flex our “L spines” up to 50 degrees as we recruit each vertebrae from top to bottom [3] Fifty degrees won’t get us down to tie our shoe but thanks to “lumbo pelvic rhythm” we can reach our hands to the floor. (See “lumbo pelvic rhythm” explanation below)
Lumbo-Pelvic Rhythm Explained:
In order for us to acheive a fold forward (or Padahastasana if you prefer), we need more flexion than the lumbar spine will give us. Remember that the lumbar spine, as a whole, can forward fold to a total of 35-52 degrees. When we bend forward from standing, we can initiate this movement from the uppermost lumbar vertebrae, flexing each segment of the lumbar spine in turn- from top to bottom. After we have fully flexed the lumbar vertebrae (which is really mostly just a flattening of the normal lumbar lordosis) we begin to rotate (tilt) our pelvis forward on our femurs. Since there is a myofascia continuum in the back of our legs and thighs that blends into and holds onto our ischial tuberosities (the part of your pelvis that feels bony when you sit on hard surfaces) a limit is set for how far forward our pelvis can tilt. [4] So the lumbar spine and pelvis work together to help us fully fold forward. This is called “lumbo- pelvic rhythm.” [3] Although your pelvis does not usually move without flexion or extension in your lumbar spine, you can play with parsing out pelvic tilt by playing like a “drinking bird.” (See video) Do this by maintaining a “flat” back while inclining your trunk forward. You can understand the interplay between the lumbar spine and the pelvis further, by experimenting with the start of a squat.
Exercise: Stand and slightly bend your knees.
Check in with your rib cage. During this exercise we want the rib cage to remain neutral and fixed in space.
put your fingers on the spines of the lumbar vertebrae.
Tilt your pelvis forward. Notice that instead of moving from top to bottom as it does in forward flexion, you can now extend your lumbar spine from bottom to top as your pelvis tilts.
As you play with this movement, try to refine it- trying to extend one vertebra at a time. Please notice that just like when forward bending, your pelvis is rotating (tilting) forward on your femurs. But now, your rib cage is not moving in space and your lumbar spine is extending from bottom to top instead of flexing from top to bottom. This is the first movement to make in a healthy squat.

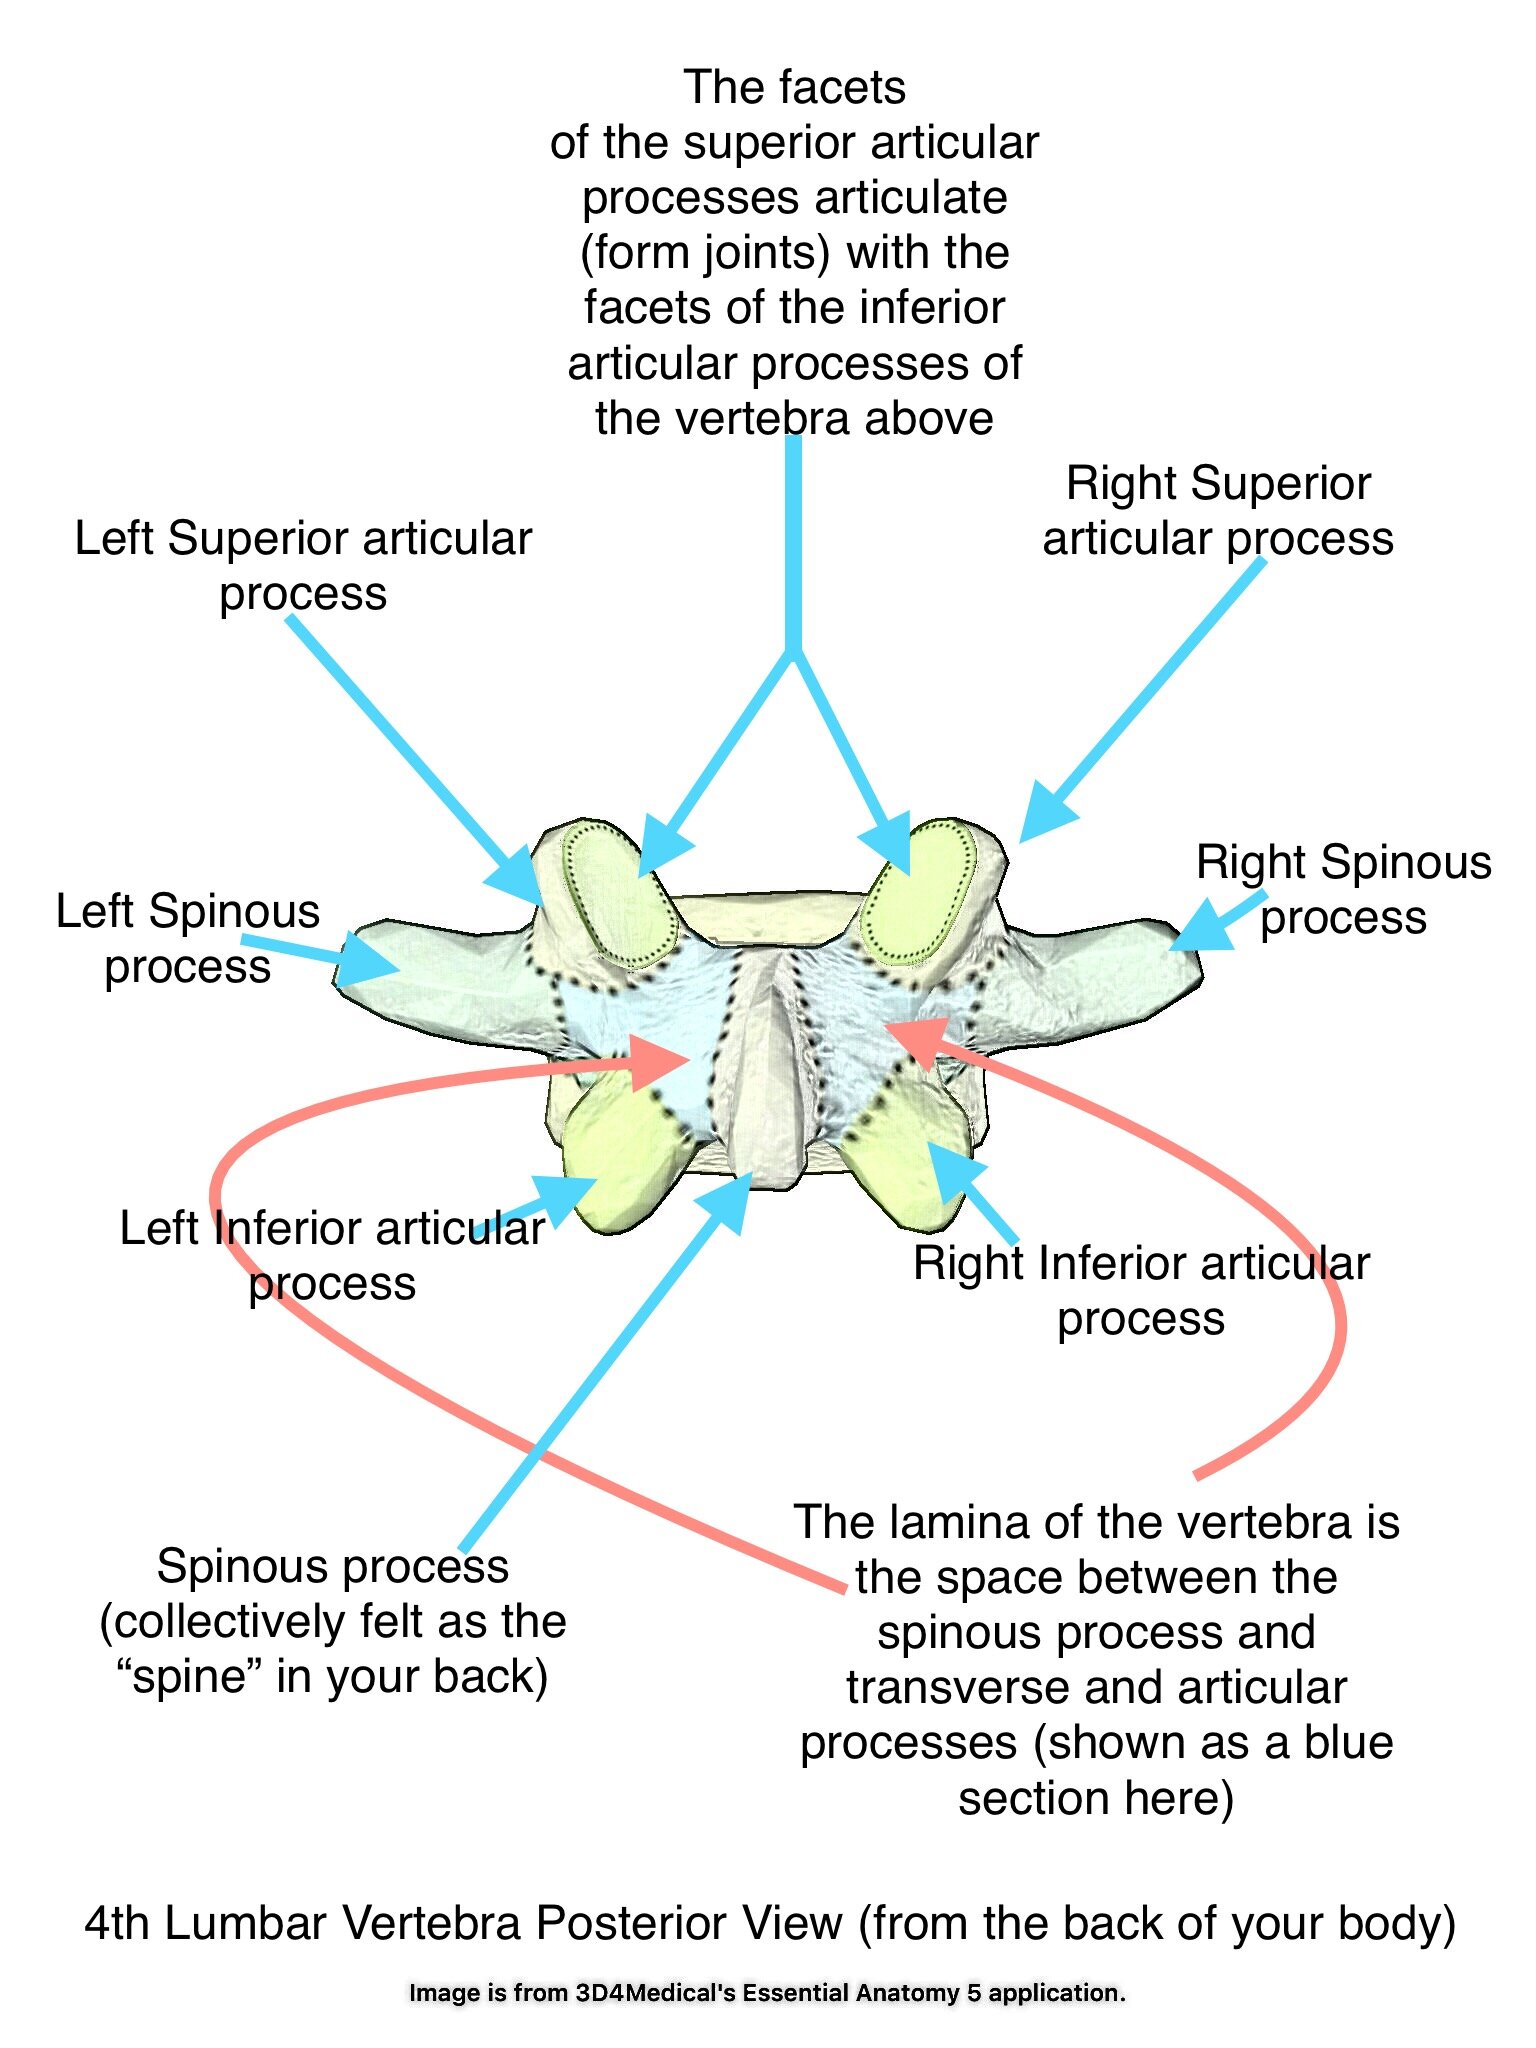
The parts of each vertebrae that allow the lumbar spine to move are the facet joints (sometimes pronounced “fuh-set” joints). These joints are formed by the slippery ends of small bony processes that project from either side of the neural arch of each vertebra.
Vertebrae have two facets below and two above. A facet is a small smooth flat surface at the end of a bony projection. These bony projections are formed out of the neural arch of each vertebra. The facet joint surfaces on the bottom of each vertebra “nest” into the facet joint surface of the vertebra below. The facet joints are synovial joints. Synovial joints in general are also called diarthrodial joints and sometimes referred to as moveable joints. Synovial joints are surrounded by ligamentous capsules. These capsules are more taut in the lumbar and thoracic spine [3]. Just inside the ligamentous capsule of each tiny facet (remember two below and two above each vertebrae) is a very thin layer of tissue that secretes synovial fluid (more on this amazing stuff in a blog linked later!). Synovial fluid provides lubrication for opposing surfaces to slide. This fluid also keeps the joint space “clean.” The ligamentous capsule of each joint is highly innervated.
When we forward or side bend the facet joints “open” on the convex side of the bend. They “close” on the concave side. So when we forward bend “each vertebra in relation to the one inferior to it slides slightly superiorly and anteriorly. When you back bend the opposite occurs: each vertebra slides slightly inferiorly and posteriorly.” [5] The abundant nerves in the joint capsule, the tissues that are stitched to the capsule, their associated nerves and the communication of these structures with surrounding and more surface tissues all serve to tell your body what is going on in each of these facet joints.*
So your lumbar spine moves something like an elegant lubricated accordion; opening and closing joint spaces as you intentionally forward, back and side bend; allowing slight rotation, extension and flexion as walk. Except when it doesn’t! And when it doesn’t life can be miserable! To find out more about (in the words of Rolfer Jeffery Maitland) ‘where your back goes when it goes out,’ read our next blog in this series. [5]
*The ligamentum flavum and multifidus muscles both have attachments to the joint capsules in the lumbar spine [3]
[1] Myers, Thomas W. Body³: a Therapist's Anatomy Reader. Kinesis, 2014.
[2] “Chapter 3 Body-Mind Interactions.” Dynamic Alignment through Imagery, by Eric N.Franklin, Human Kinetics, 2012, p. 31 .tv
[3] Oatis, Carol A. Kinesiology: the Mechanics and Pathomechanics of Human Movement. Lippincott Williams & Wilkins, 2009.
[4] Myers, Thomas W. Anatomy Trains. Churchill Livingstone/Elsevier, 2009.
Oatis, Carol A. Kinesiology: the Mechanics and Pathomechanics of Human Movement. Lippincott Williams & Wilkins, 2009.
[5] “Primates in Trouble, or Where Does Your Back Go When It Goes out?” Spinal Manipulation Made Simple a Manual of Soft Tissue Techniques, by Jeffrey Maitland and Kelley Kirkpatrick, North Atlantic Books, 2001, pp. 13-25.